Configure a Point-to-Site connectivity to a VNet using PowerShell (ARM Mode)
Task 1: Create a Self-Signed certificate
|
1. |
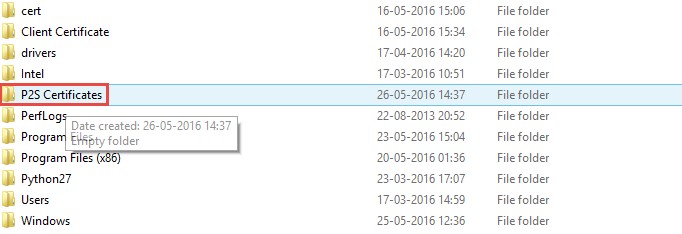
Login to your Visual Studio Virtual Machine using your credentials. Create a folder C:P2S Certificates.
|
|
2. |
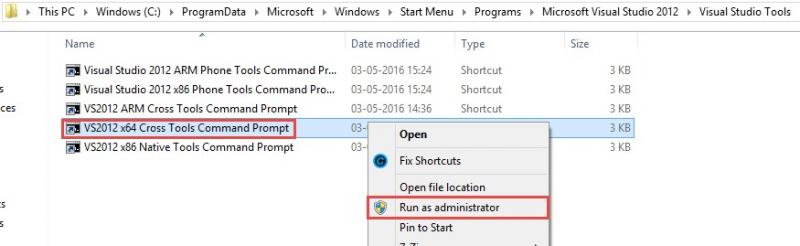
Navigate to C:ProgramDataMicrosoftWindowsStart MenuProgramsMicrosoft Visual Studio 2012Visual Studio Tools and Run VS2012 x64 Cross Tools Command Prompt as an administrator.
|
|
3. |
Run cd C:P2S Certificates.
|
|
4. |
Run the command: makecert -sky exchange -r -n "CN=RootCertificateName" -pe -a sha1 -len 2048 -ss My "RootCertificateName.cer"
|
|
5. |
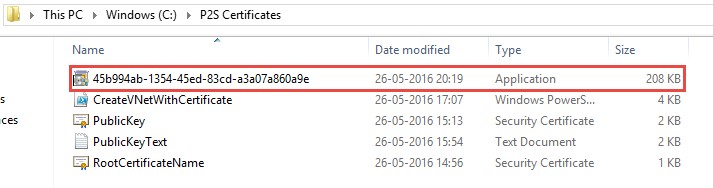
Verify that your certificate is there in the folder C:P2S Certificates
|


Task 2: Copy and store the Public Key of the root certificate in a safe location
|
1. |
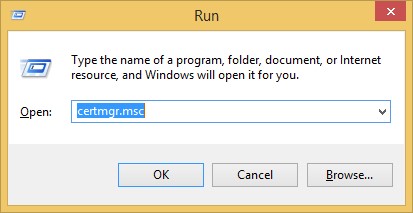
Go to Run and type certmgr.msc. Click Run
|
|
2. |
In the certmgr window, expand Personal and click on Certificates. Right click the certificate RootCertificateName àAll Tasks à Export
|
|
3. |
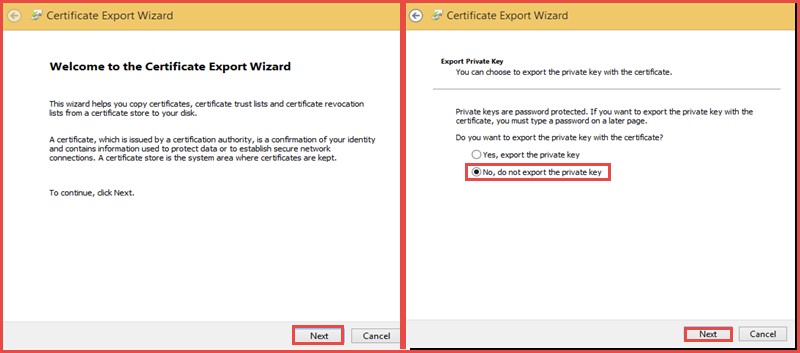
In the Certificate Export Wizard, click Next -> No, do not export the private key -> Next
|
|
4. |
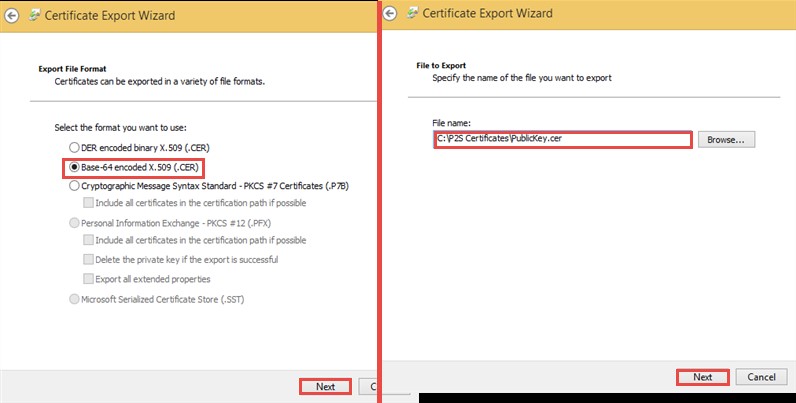
Choose Base-64 encoded X.509 (.CER) format and then click Next. In the next window, enter C:P2S CertificatesPublicKey.cer and then click Next.
|
|
5. |
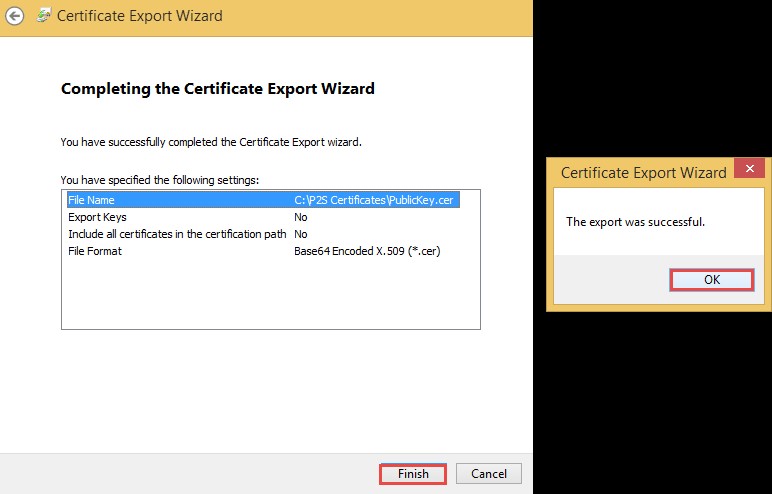
Click Finish and then click OK
|
|
6. |
Verify that the PublicKey.cert file is there in the folder C:P2S Certificates
|


Task 3: Copying Public Key in a new notepad file
|
1. |
Right click the PublicKey.cert file and open with notepad.
|
|
2. |
Remove ——BEGIN CERTIFICATE and —–END CERTIFICATE—–
|
|
3. |
Start removing the spaces from the bottom left corner. Repeat until you get a straight line of the Text in the notepad. |
|
4. |
Save the file as PublicKeyText.txt in the same folder. |


Task 4: Creating a New Virtual Network with VPN Gateway using Azure PowerShell
|
1. |
Open Azure PowerShell on your PCs and type Login-AzureRmAccount
|
|
2. |
Enter your azure credentials and click on Sign in
|
|
3. |
Choose a subscription by running the cmdlet Get-AzureRmSubscription
|
|
4. |
Select that subscription by running the cmdlet Select-AzureRmSubscription -SubscriptionName "Name of subscription".
Replace the “Name of Subscription” with the subscription name you chose in previous step.
|
|
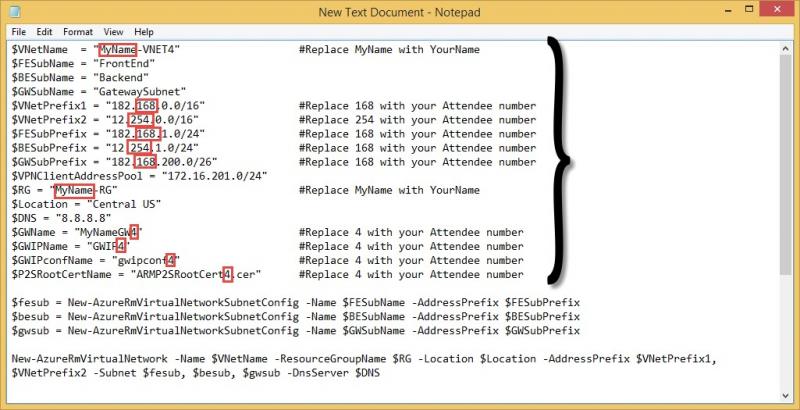
5. |
Copy the below script in a new notepad file
$VNetName = "MyName-VNET4" #Replace MyName with YourName $FESubName = "FrontEnd" $BESubName = "Backend" $GWSubName = "GatewaySubnet" $VNetPrefix1 = "182.168.0.0/16" #Replace 168 with your Attendee number $VNetPrefix2 = "12.254.0.0/16" #Replace 254 with your Attendee number $FESubPrefix = "182.168.1.0/24" #Replace 168 with your Attendee number $BESubPrefix = "12.254.1.0/24" #Replace 168 with your Attendee number $GWSubPrefix = "182.168.200.0/26" #Replace 168 with your Attendee number $VPNClientAddressPool = "172.16.201.0/24" $RG = "MyName-RG" #Replace MyName with YourName $Location = "Central US" $DNS = "8.8.8.8" $GWName = "MyNameGW4" #Replace 4 with your Attendee number $GWIPName = "GWIP4" #Replace 4 with your Attendee number $GWIPconfName = "gwipconf4" #Replace 4 with your Attendee number $P2SRootCertName = "ARMP2SRootCert4.cer" #Replace 4 with your Attendee number
$fesub = New-AzureRmVirtualNetworkSubnetConfig -Name $FESubName -AddressPrefix $FESubPrefix $besub = New-AzureRmVirtualNetworkSubnetConfig -Name $BESubName -AddressPrefix $BESubPrefix $gwsub = New-AzureRmVirtualNetworkSubnetConfig -Name $GWSubName -AddressPrefix $GWSubPrefix
New-AzureRmVirtualNetwork -Name $VNetName -ResourceGroupName $RG -Location $Location -AddressPrefix $VNetPrefix1,$VNetPrefix2 -Subnet $fesub, $besub, $gwsub -DnsServer $DNS
$vnet = Get-AzureRmVirtualNetwork -Name $VNetName -ResourceGroupName $RG $subnet = Get-AzureRmVirtualNetworkSubnetConfig -Name "GatewaySubnet" -VirtualNetwork $vnet
$pip = New-AzureRmPublicIpAddress -Name $GWIPName -ResourceGroupName $RG -Location $Location -AllocationMethod Dynamic $ipconf = New-AzureRmVirtualNetworkGatewayIpConfig -Name $GWIPconfName -Subnet $subnet -PublicIpAddress $pip
$MyP2SRootCertPubKeyBase64 = "Paste your Public Key Here" $p2srootcert = New-AzureRmVpnClientRootCertificate -Name $P2SRootCertName -PublicCertData $MyP2SRootCertPubKeyBase64
New-AzureRmVirtualNetworkGateway -Name $GWName -ResourceGroupName $RG -Location $Location -IpConfigurations $ipconf -GatewayType Vpn -VpnType RouteBased -EnableBgp $false -GatewaySku Standard -VpnClientAddressPool $VPNClientAddressPool -VpnClientRootCertificates $p2srootcert
|
|
6. |
Replace the Values as specified in the comments
|
|
7. |
Paste your Public Key Obtained from Task 3 in the double quotes of $MyP2SRootCertPubKeyBase64 variable.
|
|
8. |
Save the file as CreateVNetWithCertificate.ps1
|
|
9. |
Run PowerShell ISE as an administrator and run the above Script.
|
|
10. |
Wait for a couple of minutes for the script to take its required action. Your output should be similar to this:
|


Task 5: Downloading the VPN Client Configuration Package
|
1. |
In the same PowerShell_Ise window, run the cmdlet: Get-AzureRmVpnClientPackage -ResourceGroupName $RG -VirtualNetworkGatewayName $GWName -ProcessorArchitecture Amd64
|
|
2. |
Copy the URL from the output and run it in your browser.
|
|
3. |
Save the client certificate in a safe location lets say C:P2S Certificates.
|


Task 6: Generating and Installing the Client Certificate from the Root Certificate
|
1. |
Navigate to C:ProgramDataMicrosoftWindowsStart MenuProgramsMicrosoft Visual Studio 2012Visual Studio Tools and Run VS2012 x64 Cross Tools Command Prompt as an administrator.
|
|
2. |
Run cd C:P2S Certificates.
|
|
3. |
Run the command: makecert.exe -n "CN=ClientCertificateName" -pe -sky exchange -m 96 -ss My -in "RootCertificateName" -is my -a sha1
|
|
4. |
Open Run using Win + R and Open certmgr.msc
|
|
5. |
Expand Personal -> Certificate. Right click ClientCertificateName -> All Tasks -> Export.
|
|
6. |
Click Next and then Select Yes, export the private key and then click Next
|
|
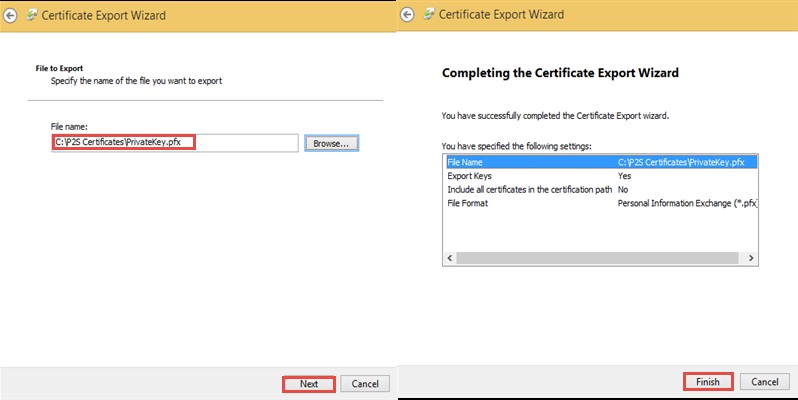
7. |
Follow the further steps as described in the image below. Type Passwords as Desired.
|
|
8. |
Select the directory to C:P2S Certificates to store the certificate with name PrivateKey.pfx. Click Finish then. 16. |
|
9. |
Click OK. |
|
10. |
Confirm that the file is exported in the directory C:P2S Certificates
|
|
11. |
Double click the file and follow the procedures to Install.
|
|
12. |
Enter your password for the password field and follow the rest of the procedures from the image.
|
|
13. |
Click Finish and then click OK. |


Task 7: Installing the Client VPN package and connecting to the VPN
|
1. |
Navigate to the directory C:P2S Certificates and install the Client Configuration Package.
|
|
2. |
Click networks from the Bottom Right corner.
|
|
3. |
You Will be able to see the VPN Network in the Networks Pane.
|
|
4. |
Click Connect
|
|
5. |
Click Connect Again
|
|
6. |
Click Continue.
|
|
7. |
Navigate back to the networks pane and confirm that the network connectivity has been established.
|
|
8. |
To confirm that the connectivity has been established, open command prompt and run the command ipconfig /all. Your output should be similar to this.
|


THANKS!