Examples of Selenium Webdriver Scripts
Now its time to code and execute the selenium webdriver scripts after installation of TestNG framework successfully.

Example 1: Create a class as “Example” copy and paste the below mentioned code and right click on classname and mouse over on “Run As” option and click on “TestNG Test” option.
Code:
package Newpack;
import org.openqa.selenium.By;
import org.openqa.selenium.WebDriver;
import org.openqa.selenium.WebElement;
import org.openqa.selenium.firefox.FirefoxDriver;
import org.testng.annotations.Test;
public class Example {
public String baseUrl= “http://www.google.com/”;
public WebDriver driver = new FirefoxDriver();
@Test
public void verifyHomePageTitle() {
driver.get(baseUrl);
// Find the text input element by its name
WebElement element = driver.findElement(By.name(“q”));
// Enter something to search for
element.sendKeys(“Cheese!”);
// Now submit the form. WebDriver will find the form for us from the element
element.submit();
// Check the title of the page
System.out.println(“Page title is: ” + driver.getTitle());
driver.quit();
}
}
Results of running the Testng Test Case
13. Give it few minutes to complete the execution, once it is finished the results will look like this in the TestNg Result window.

It displayed ‘passed: 1′. This means test is successful and passed.
There are 3 sub tabs. “All Tests”, “Failed Tests” and “Summary”. Just click “All Tests” to see what is there.
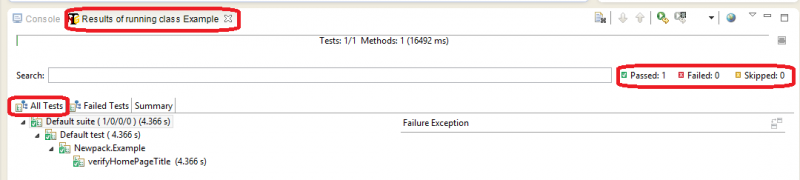
There is information of which test cases are executed and their duration.
14. TestNG also produce HTML reports. To access those reports go to test-output folder and open ‘emailable-report.html‘, as this is a html report open it with browser.

15. TestNG also produce ‘index.html‘ report and it resides in the same test-output folder. This reports gives the link to all the different component of the TestNG reports like Groups & Reporter Output. On clicking these will display detailed descriptions of execution. In the advance chapter of TestNG we will go though each of the TestNG topics.

Example 2: Create a script for Login and logout scenario as shown below and right click on classname and mouse over on “Run As” option and click on “TestNG Test” option.
Code:
package com.test.webdriver;
import static org.testng.AssertJUnit.assertEquals;
import org.openqa.selenium.By;
import org.openqa.selenium.WebDriver;
import org.openqa.selenium.firefox.FirefoxDriver;
import org.testng.annotations.AfterClass;
import org.testng.annotations.BeforeClass;
import org.testng.annotations.Test;
public class Driver {
private WebDriver driver;
@BeforeClass
public void Startup(){
driver = new FirefoxDriver();
}
@Test (description=”Google Login”)
public void GoogleLogin() throws Exception{
driver.get(“http://www.gmail.com”);
assertEquals(“Sign in”, driver.findElement(By.id(“signIn”)).getAttribute(“value”));
driver.findElement(By.id(“Email”)).sendKeys(“*********”);
driver.findElement(By.id(“Passwd”)).sendKeys(“**********”);
driver.findElement(By.id(“signIn”)).click();
Thread.sleep(10000);
driver.switchTo().frame(“canvas_frame”);
driver.findElement(By.id(“gbgs4dn”)).click();
driver.findElement(By.id(“gb_71”)).click();
driver.switchTo().defaultContent();
assertEquals(“Sign in to Gmail”, driver.findElement(By.id(“button”)).getText());
}
@AfterClass
public void teardown(){
driver.quit();
}
}