Since we all know In Microsoft Dynamics NAV 2013 R2, the support for the .fbk files was removed, but with Cumulative Update 8 for Microsoft Dynamics NAV 2013 R2, Microsoft has introduced Windows PowerShell cmdlets so you can export data from a Microsoft Dynamics NAV database and import it into another Microsoft Dynamics NAV database.
Also in order to solve the complexity for exporting and importing the data using cmdlets, now you can also export and import data from the Microsoft Dynamics NAV Windows client as well.
You can export and import a single company or all companies in a database, and you can export and import other types of data such as global data, application data, and application objects.
When you export data from a Microsoft Dynamics NAV database, the data is stored in a file with the extension .navdata, which is a new file format that is proprietary to Microsoft Dynamics NAV. You cannot edit the .navdata files in other tools.
The data that you export is not deleted from the original database. So that means you can use the functionality to essentially take a copy of your customer’s live data, leave them to continue working, while you import the data into an offline database backup at your office for further debugging or other investigation. You can also use the .navdata files to move data to a new database, such as moving a company to a new database when you want to deprecate a database, for example.
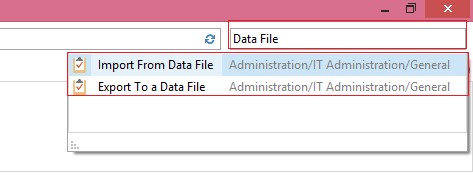
To export or import data, in the Microsoft Dynamics NAV Search box, enter the text “Data File”, and then click on the search result “Export to a Data file”:
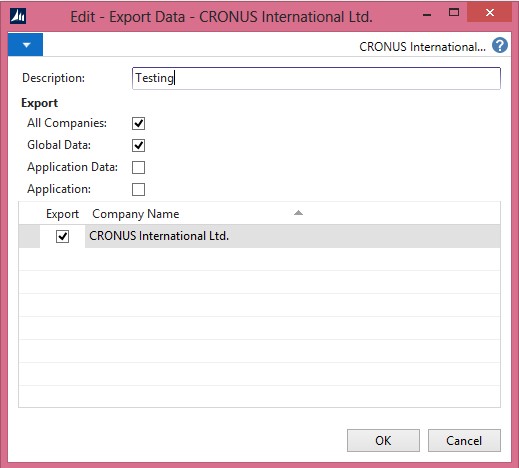
Once you click “Export to a Data File” NAV system will open the page where you can define the export file name and also you can select the option according to your requirment, for example ,if you want to export all companies available in the database then select the first option “All Companies”, this will export all the list of company available in the database.
To export data, you specify the type of data that you want to export, and when you choose the OK button, here you specify file path where you want to save the file.
see the below screen:
Once you define the file name and other required selection and then if you click on Ok, system will ask you to specify the path where you want to store the .navdata file.
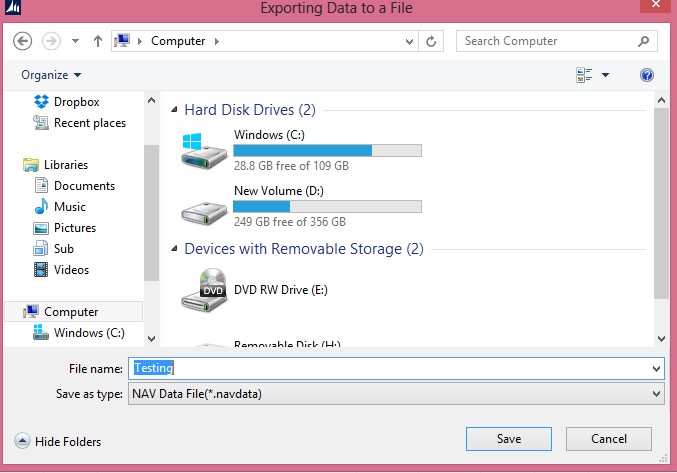
You can save this file anywhere you wish to save, just specify the file name and the path to store the file.
Importing data :
To import data which you have exported in the previous step, you specify the path for the .navdata file to import data from, but you can’t import an application if the .navdata file contains an application. This is because you can’t overwrite the application that is currently open in the Microsoft Dynamics NAV Windows client. So the window has one less type of data that you can choose to import compare to cmdlets:
Click on “Import Data from File” (Path: Administrator/IT Administration/General)
Specify the data file which you want to import, please see the below screen for details.

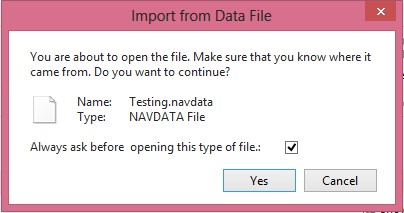
Once you select the .navdata file and click on ok to import the data, then system will prompt you for confirmation which basically notify you that you are going to import the data from external file.
Once you click on yes then system will start importing the selected company data.