
What if building an app for Jira was as simple as writing your business logic and running a few CLI commands? No servers. No deployment pipelines. No authentication headaches. Just code, deploy, and install. Today, most cloud-based tools are moving toward this simple way of building extensions and integrations.

What is Atlassian Forge?
Atlassian Forge is a serverless cloud development platform that lets you build, deploy, and host apps for Atlassian products such as Jira, Confluence, and Bitbucket without worrying about managing servers, infrastructure, or security. Atlassian Forge is built on a modern cloud stack. The backend uses Node.js to handle business logic and API calls, while the frontend can be built using either UI Kit for ready-made components or Custom UI with React for full flexibility. Everything runs securely on Atlassian Cloud, so you only need to focus on your app logic.
Prerequisites for Atlassian Forge Development
To start building apps with Forge, you’ll need a few basic tools and access setup:
- ~ Atlassian account – to access Jira, Confluence, or Bitbucket Cloud
- ~ Atlassian Cloud site – a Jira or Confluence instance for testing your app
- ~ Node.js (LTS version) – required to run and manage Forge projects
- ~ npm (Node Package Manager) – comes with Node.js for installing dependencies
- ~ Forge CLI (Command Line Interface) – the main tool to create, deploy, and manage apps
- ~ VS Code (Visual Studio Code) – a code editor used to write and manage your Forge app code easily
Creating Your First Forge App
In the following steps, we’ll build a basic Forge app from scratch.
Step 1: Install Required Tools and Create Project Folder
Before starting Forge development, you need to install a few essential tools and set up your project workspace.
i) Download and install the LTS version of Node.js from the official website:
https://nodejs.org
Check Node.js install or not:-
Open VS Code → Press Ctrl + ` (backtick key) → OR go to Terminal → New Terminal
Command: node -v
npm -v
- If you see a version number → Node.js is installed correctly
- If error appears → Node.js is not installed
ii) Once Node.js is installed and verified, install the Forge CLI, which is used to create, deploy, and manage Forge apps.
Command:- npm install -g @forge/cli
iii) Create a dedicated folder to store your Forge applications.
Navigate to the location where you want to keep your projects. For example, to use the Desktop:
Command:- cd Desktop
Create a new folder:
Command:- mkdir forge-app
Move into the newly created folder:
Command:- cd forge-app
Step 2: Log in to Your Atlassian Account
After installing the Forge CLI, the next step is to authenticate it with your Atlassian account. This allows the CLI to deploy and manage your Forge applications.
Run the following command: forge login
The CLI will prompt you to enter the following details:
- Email Address – Enter the email address associated with your Atlassian account.
- Atlassian API Token – Generate API Token from Atlassian account
To verify that the login was successful, run: forge whoami
If the authentication is successful, the command displays the email address associated with your Atlassian account.
Step 3: Create Your First Forge Application
Now that the CLI is authenticated, you can create your first Forge project.
Run the following command: forge create
1. Select the Developer Space
First, you’ll be asked to choose the Developer Space where your application will be created.
Select a Developer Space
If you have access to multiple Developer Spaces, select the appropriate one. Otherwise, enter developer space name
2. Enter the App Name: forge-app
3. Choose the Atlassian Product: The CLI will then ask which Atlassian product your app is intended for like Jira, Confluence, Bitbucket, Jira Service Management
4. Select the App Category
Next, choose how you want to build your application’s user interface.
You can choose either:
- ~ UI Kit – Uses Atlassian’s built-in UI components and is ideal for simple applications with a native Jira look and feel.
- ~ Custom UI – Allows you to build your own frontend using React, HTML, CSS, and JavaScript for greater flexibility.
5. Choose Where the App Should Be Displayed
Finally, select the module where your application will appear within Jira.
Example:- Jira Issue Context
Step 4: Understanding the Project Structure
After the project is created, you’ll notice a simple directory structure.
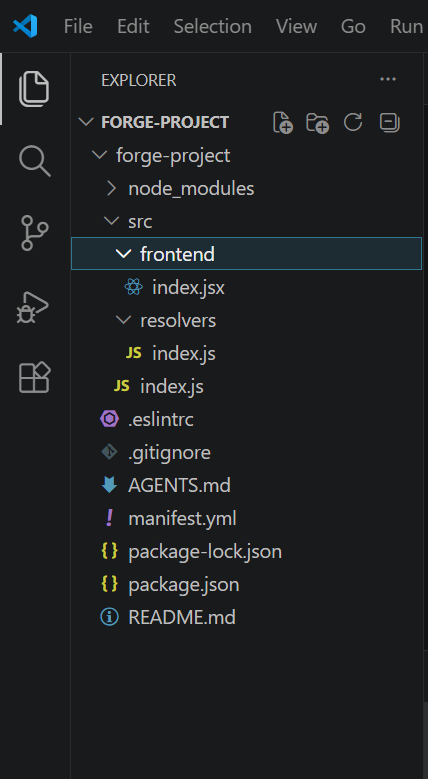
\src\
This directory contains the source code for your app. It is where you will define the app’s logic and user interface components.
\src\frontend\
This subdirectory is specifically for frontend code, including UI components.
index.jsx
This is the main entry point for your app’s UI. This file is where you define the appearance and behavior of your app using UI Kit components.
\src\resolvers\
This folder contains backend functions known as resolvers. They act as a bridge between the frontend of your app and any logic or data processing that needs to happen securely on the server side.
manifest.yml
This is the core configuration file for your Forge app. This file contains the name and ID of the app, the app permissions, and the modules the app uses.
package.json
This file manages the project’s dependencies, scripts, and metadata.
Step 5: Deploy the Application
Once you’ve made changes to your application, deploy them to Atlassian Cloud using: forge deploy
By default, the application is deployed to the development environment.
To deploy directly to the production environment, specify the environment using: forge deploy -e production
Each deployment uploads the latest version of your application to Atlassian’s cloud infrastructure.
Step 6: Install the Application
After deployment, install the application on your Jira or Confluence site.
Run: forge install
The CLI will prompt you to:
- Select the Atlassian product (Jira or Confluence)
- Enter your Atlassian Cloud site (for example, your-domain.atlassian.net)
Once installation is complete, your application becomes available within the selected Atlassian product according to the module defined in the manifest.yml file.
If you later modify your app, simply redeploy it using forge deploy. In most cases, you won’t need to reinstall the application unless you’ve added new permissions or modules.
Step 7: Develop, Test, and Debug
During development, continuously deploying after every small change can be time-consuming.
Forge provides a tunneling feature that connects your local development environment with your deployed application.
Start the tunnel using: forge tunnel
With the tunnel running, changes made to your local code are reflected immediately, allowing you to test your application much faster.
The tunnel also streams logs directly to your terminal, making it easier to debug issues during development.
Note: Before deploying your app, run forge lint to validate your manifest and catch syntax issues early. It helps you avoid unnecessary deployment errors and speeds up development.
Step 8: Share or Publish Your Application
After your application has been thoroughly tested, you can either share it privately within your organization or publish it on the Atlassian Marketplace.
Publish to the Atlassian Marketplace
If you want your application to be available to customers worldwide, you can publish it on the Atlassian Marketplace.
Before publishing, ensure that your application satisfies Atlassian’s security, performance, and compliance requirements. Once approved, other organizations can discover, install, and use your app directly from the Marketplace.
Conclusion
Atlassian Forge makes cloud app development easy by removing the need to manage servers or infrastructure. It provides a secure and scalable way to build apps for Jira, Confluence, and other Atlassian products.
With just a few CLI commands, you can create, deploy, test, and share a working cloud app. Whether you’re building a tool for your team or planning to publish it on the Atlassian Marketplace, Forge helps you focus more on building features instead of handling setup or server management.
About Canarys Automations
As an Atlassian Gold Partner, we help organizations maximize the value of Atlassian tools through expert implementation, customization, and reliable support across the entire Atlassian ecosystem. Partner with us to enhance collaboration, streamline workflows, and drive business success. Contact us at atlassiansupport@ecanarys.com to get started.