Imagine a customer has a critical issue and needs help immediately. Would they rather submit a ticket and wait for a response, or connect with a support agent instantly? For most users, the answer is obvious-and that’s exactly why Live Chat has become an essential feature in modern service management.
What is Live Chat in Jira Service Management?
Live Chat in Jira Service Management is a real-time support feature that allows users to connect instantly with support agents through a chat window instead of raising a ticket and waiting for a response.
It enables faster communication, quicker issue resolution, and improved customer experience, while still allowing conversations to be tracked and converted into service requests when needed.
Key Benefits of Live Chat in Jira Service Management
Live Chat in Jira Service Management offers several advantages that improve both customer support and team efficiency:
- ~ Faster response times – Users get instant help instead of waiting for ticket responses.
- ~ Improved customer experience – Customer can talk to support like a normal chat, which is easier.
- ~ Quick issue resolution –Problems can often be solved during the chat itself.
- ~ Seamless ticket creation – Chats can be converted into service requests for tracking.
- ~ Improved communication – Direct interaction reduces misunderstandings and delays.
How To Set Up a Live Chat in Jira Service Management?
Step 1: Open Your Service Project
Go to your Jira Service Management project where you want to enable live chat.
Step 2: Open Project Settings
In your Jira Service Management project, click the three-dot menu (⋯) next to the space name and select Space settings from the dropdown menu.
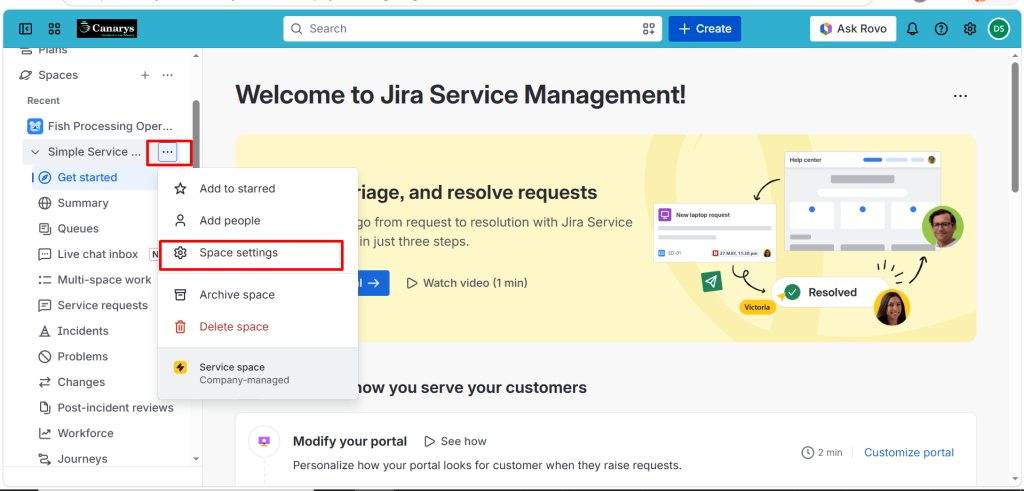
Step 3: Select Live Chat Option
Under Channels / self service, click on Live Chat.

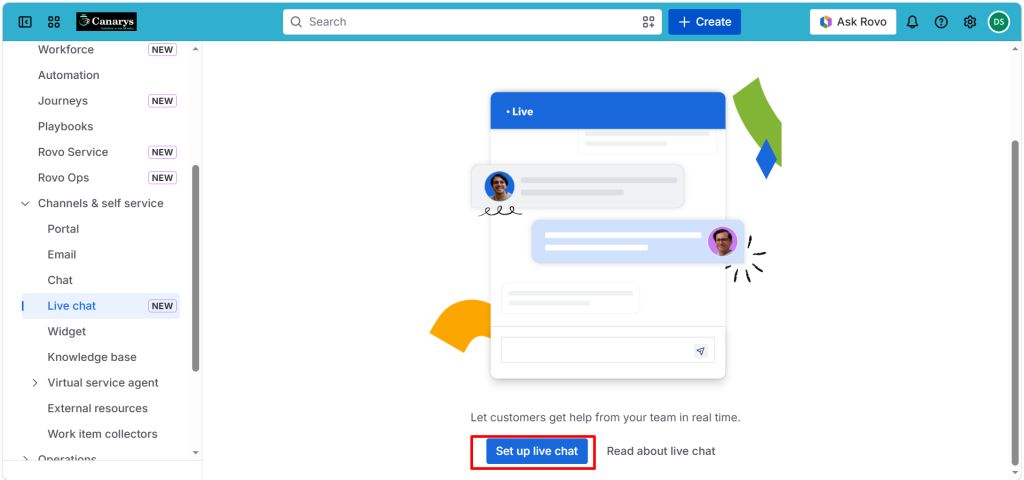
Step 4: Set Up Live Chat and Assign a Team
On the Live Chat page, click Set Up Live Chat to begin the configuration.
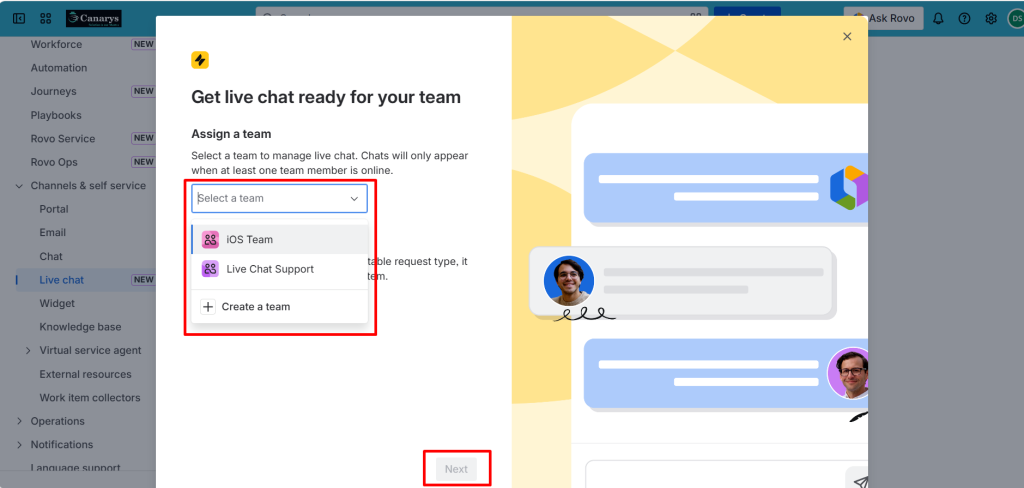
Next, select an existing team that will handle live chat requests. If no team is available, click Create Team and add agents who will respond to customer chats.
After selecting the team, click Next to continue.
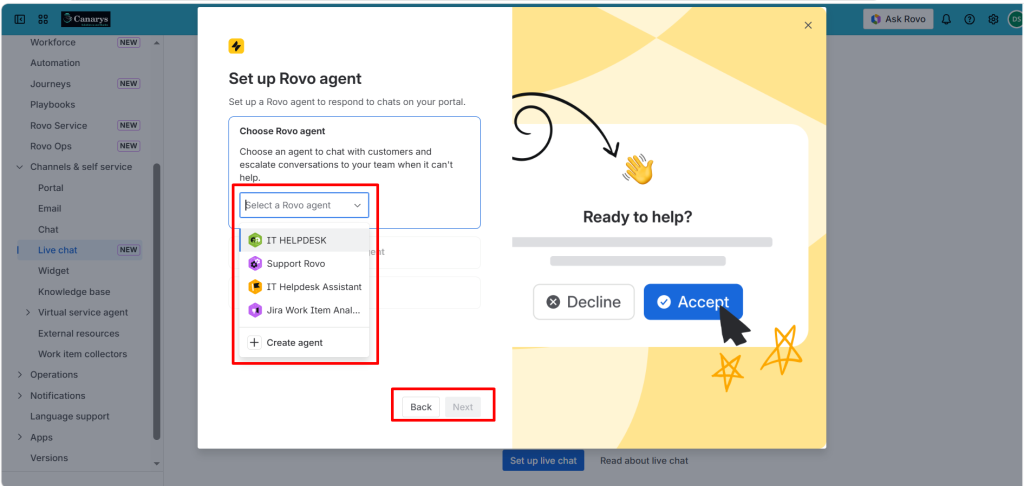
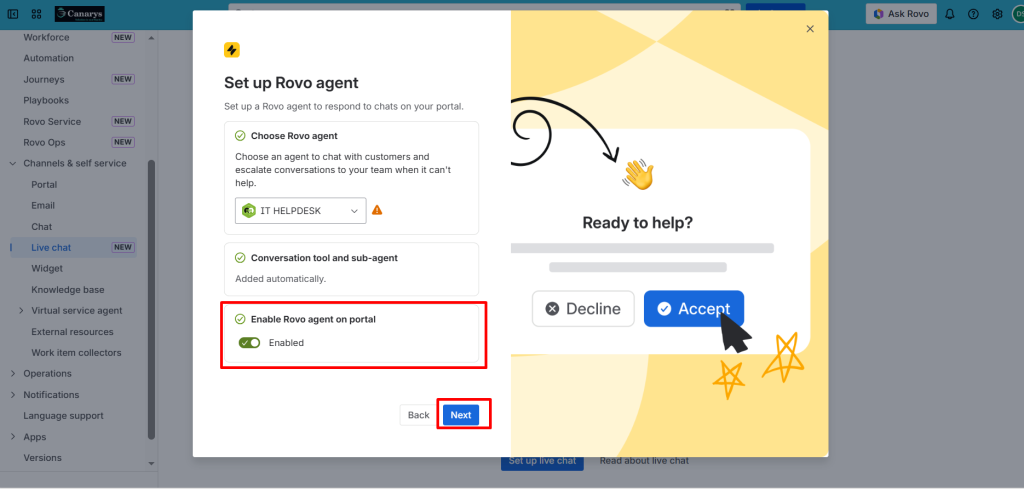
In the next screen, choose an existing Rovo Agent or click Create Rovo Agent. The system will automatically configure the agent based on your project settings and request types.
Want to create a custom Rovo Agent? click the link below.
How to Build Your First Rovo Agent Without Coding – Canarys
Enable the Rovo Agent on Portal toggle to allow the agent to interact with customers directly through the service portal.
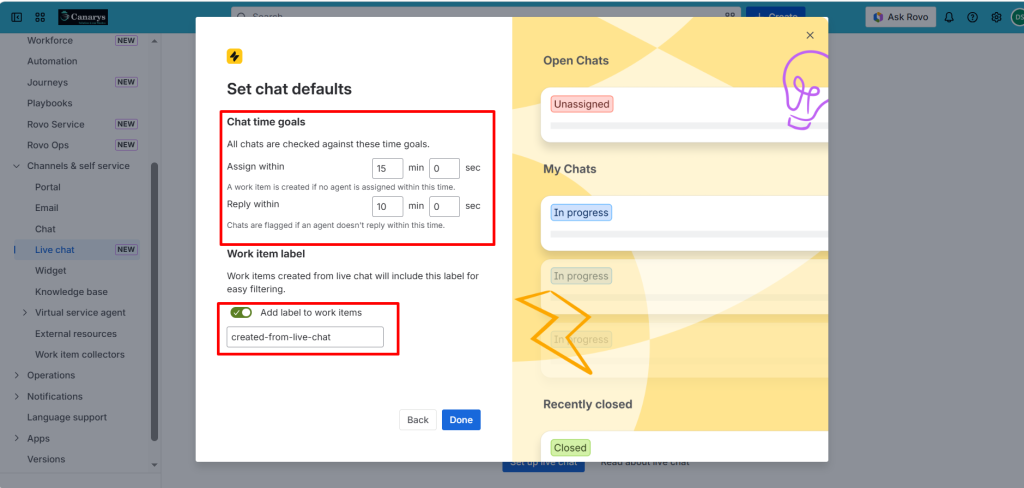
Then configure the Chat Time Goals:
- ~ Assign Within – Set how quickly a chat should be assigned to an agent (example: 15 minutes)
- ~ Reply Within – Set how quickly an agent should respond (example: 10 minutes)
Finally, add a Work Item Label such as created-from-live-chat to easily track all chat-based requests.
Click Done to complete the Live Chat setup.
Step 5: Configure Agent Availability and Enable Browser Notifications
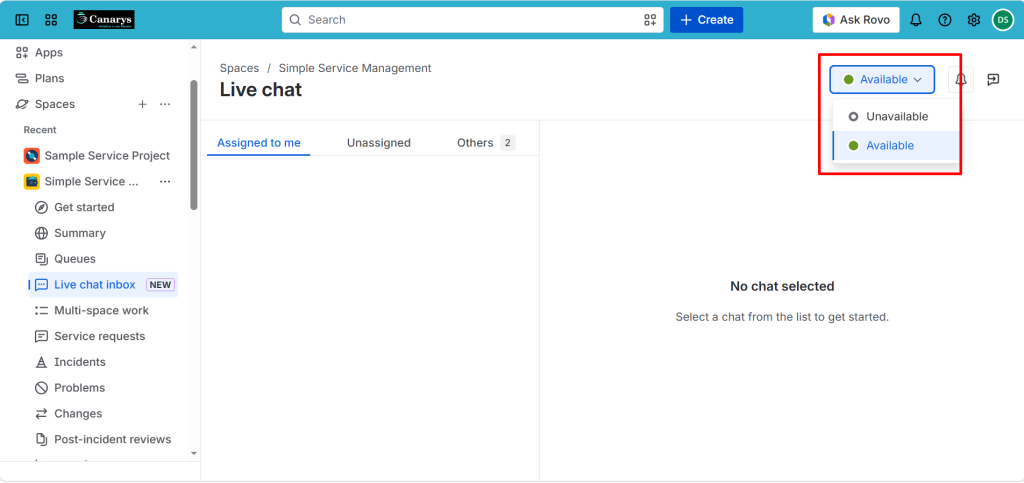
After setting up Live Chat, configure when support agents will be available to receive and respond to chat requests.
In your Space, navigate to the Live chat inbox and set the agent availability. This determines when customers can start live chat conversations with your support team.
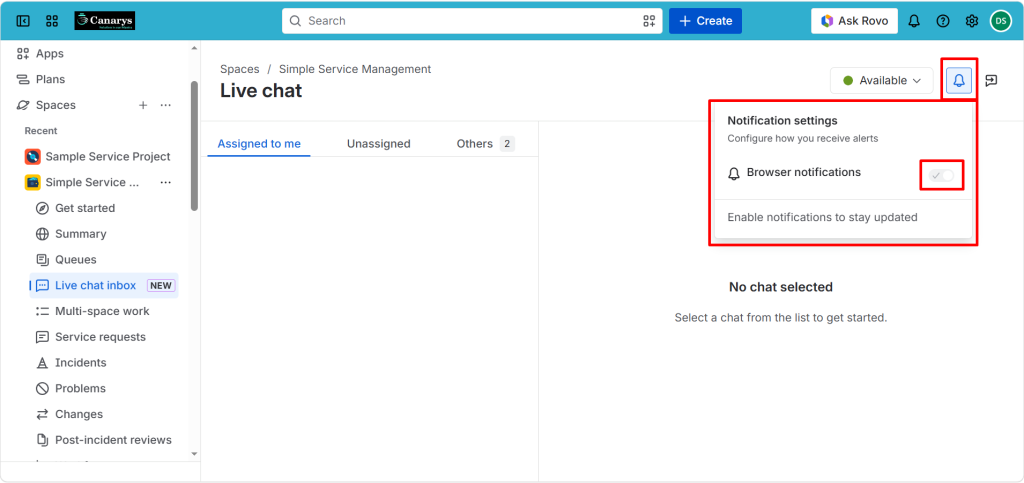
To ensure agents receive alerts for incoming chat requests, browser notifications should be enabled.
Step 6: Test the Live Chat Experience
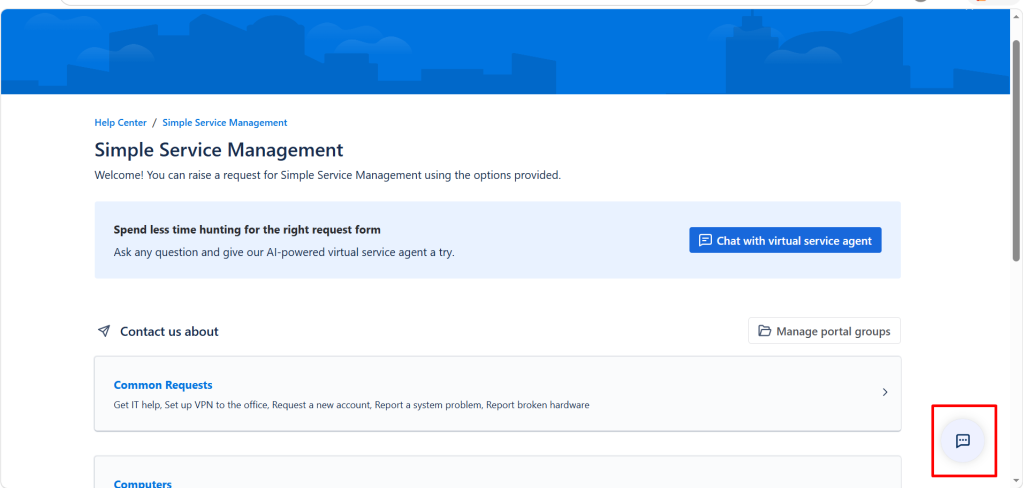
To begin testing, open your Jira Service Management customer portal by navigating to your service project and clicking on “Space settings” → “Channels / self service” → “Portal”.
After opening the customer portal, you will see the Live Chat widget appear in the bottom-right corner of the screen.
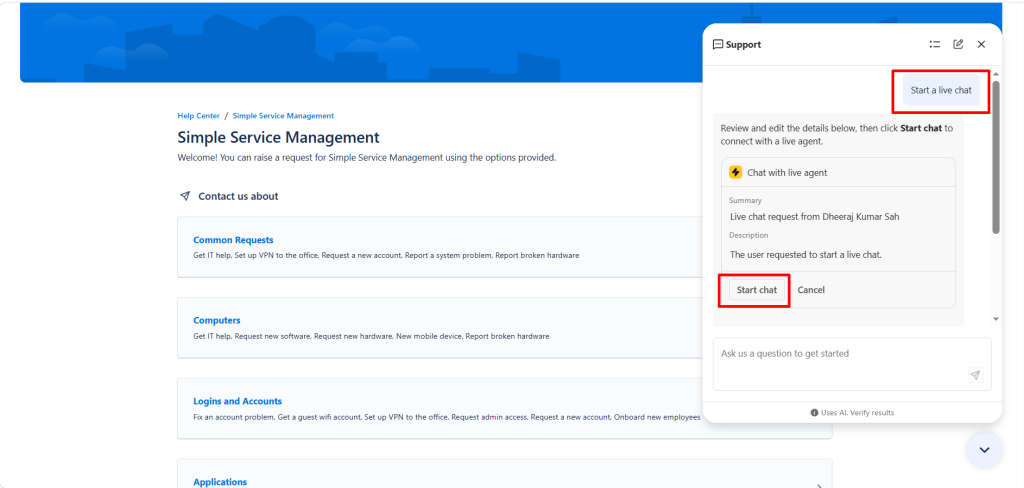
When you start typing in the chat box (for example, “Start a live chat”), a live chat request is initiated and sent to the assigned support team. This creates a pending chat session that is not yet active.
On the agent side, the request appears in the Live Chat inbox. The agent must accept the chat request in order to start the conversation with the customer.
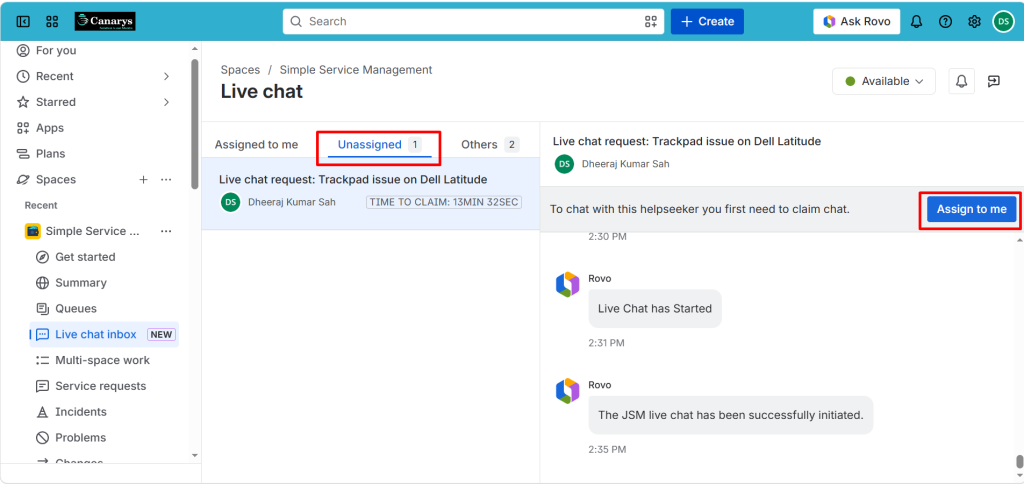
Once accepted, the chat becomes active, and both the customer and agent can communicate in real time.
About Canarys Automations
As an Atlassian Gold Partner, we help organizations maximize the value of Atlassian tools through expert implementation, customization, and reliable support across the entire Atlassian ecosystem. Partner with us to enhance collaboration, streamline workflows, and drive business success. Contact us at atlassiansupport@ecanarys.com to get started.